Think of FIPS 140-3 as a security inspection
FIPS 140-3 is not just asking whether a module uses AES or another approved algorithm. It asks whether the whole cryptographic module is designed, documented, operated, and protected correctly.
The plates explain the validation flow and the difference between levels. Some requirements are about algorithms and self-tests; higher levels add stronger identity, tamper evidence, tamper response, and key protection.
For chip and module designers, the practical questions are simple: where are the keys, who can use them, what happens during attack, and what evidence proves the design behaves as claimed?
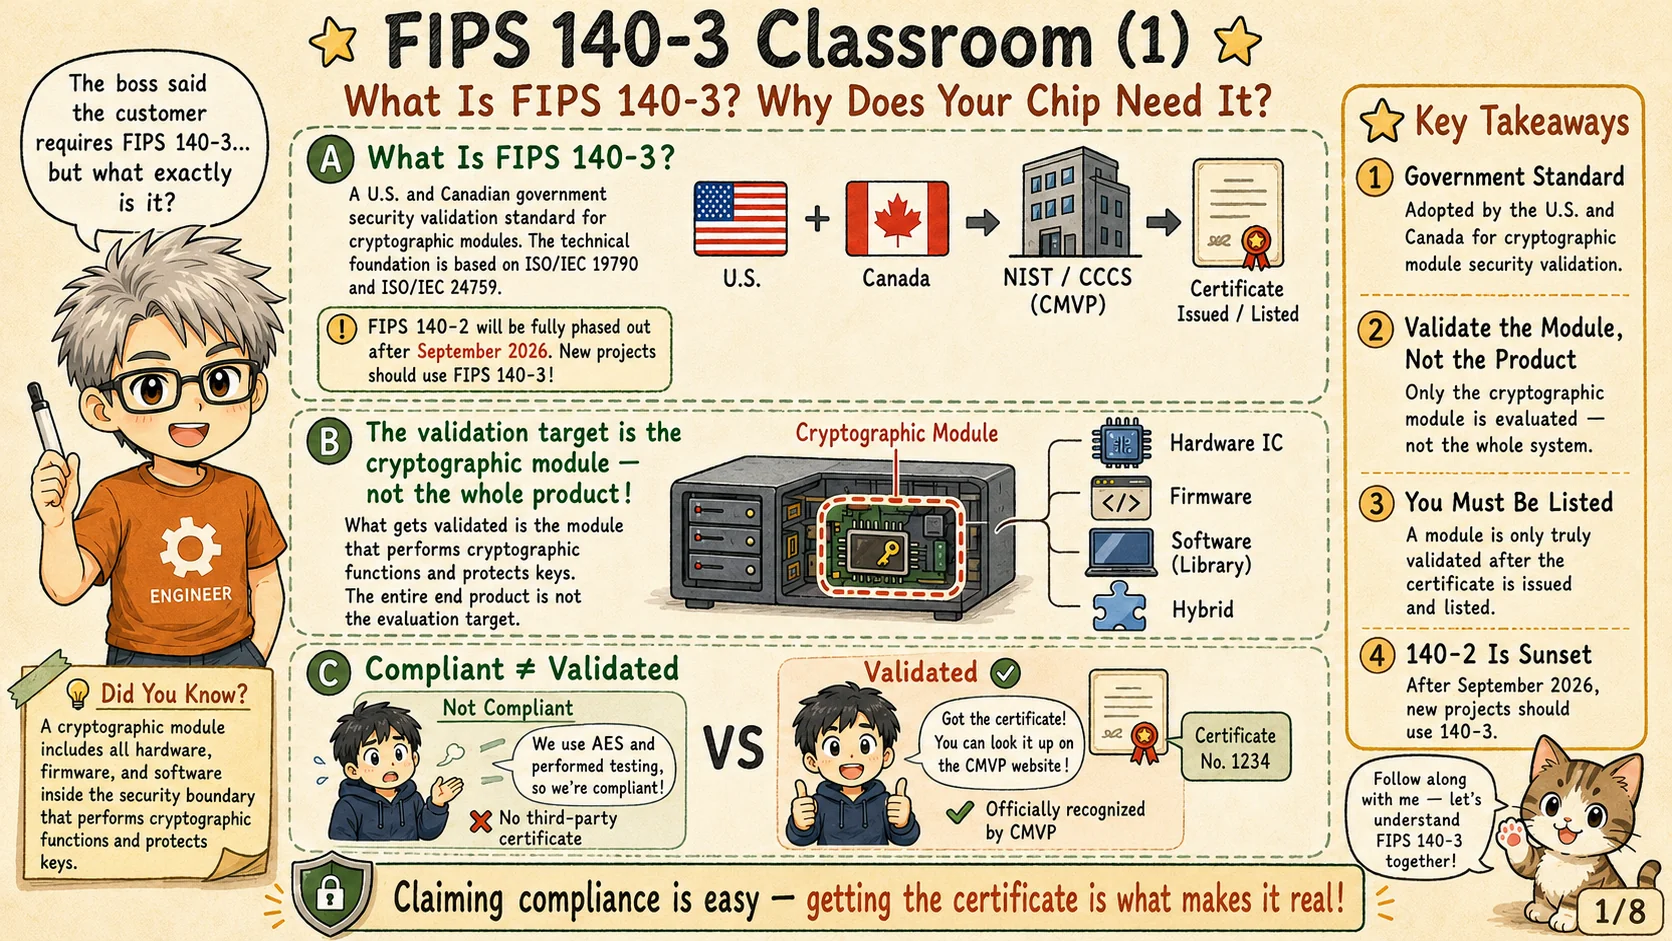
FIPS 140-3 validates a cryptographic module
The first page clarifies the most important sentence in the whole topic: FIPS 140-3 validates a cryptographic module, not a marketing slogan and not an entire product by default. The module may be a hardware IC, a firmware-controlled subsystem, a software library, or a hybrid boundary. What matters is that the boundary is explicit and that the cryptographic functions, interfaces, roles, services, and secrets inside that boundary are evaluated together.
This is why 'we use AES' is not the same as 'we are FIPS validated'. An algorithm certificate proves that an algorithm implementation passed algorithm testing, but module validation also asks how keys are generated, entered, output, stored, zeroized, and protected; how self-tests run; which operational modes are approved; and what the public security policy promises.
For semiconductor teams, the boundary decision is often the first real design decision. Is the module only the AES/SHA/TRNG block? Is it the secure subsystem with firmware? Does it include OTP, PUF, key ladder, debug control, secure boot ROM, or anti-tamper sensors? The answer changes evidence, test hooks, documentation, and sometimes silicon architecture.
The practical lesson is to define the module boundary before implementation freezes. If the boundary moves late, the security policy, test plan, validation evidence, and customer contract can all move with it.

Start with boundary, algorithms, and evidence
The second page treats validation as a project flow. A serious FIPS 140-3 program usually starts with scope definition, algorithm selection, CAVP algorithm testing, security policy drafting, finite-state model preparation, design evidence, vendor documentation, lab testing, and CMVP review. It is closer to a product certification program than to a one-time unit test.
The CSTL laboratory is not simply checking whether the chip can encrypt one test vector. It reviews whether the submitted module behaves exactly as the security policy says it does. If a service is documented as available only in approved mode, the implementation and test evidence must support that. If keys are claimed to be zeroized, the design has to explain when, how, and under what conditions.
This is why documentation is engineering work. Security policy, user guidance, finite-state model, key lifecycle diagrams, self-test descriptions, entropy-source documentation, and operational-environment assumptions must agree with RTL, firmware, testbench behavior, manufacturing settings, and customer-visible APIs.
A healthy project keeps a traceability table: requirement, design feature, implementation location, test evidence, document owner, and lab question status. That table is not bureaucratic decoration; it is how the team avoids rediscovering certification gaps after tape-out or product release.
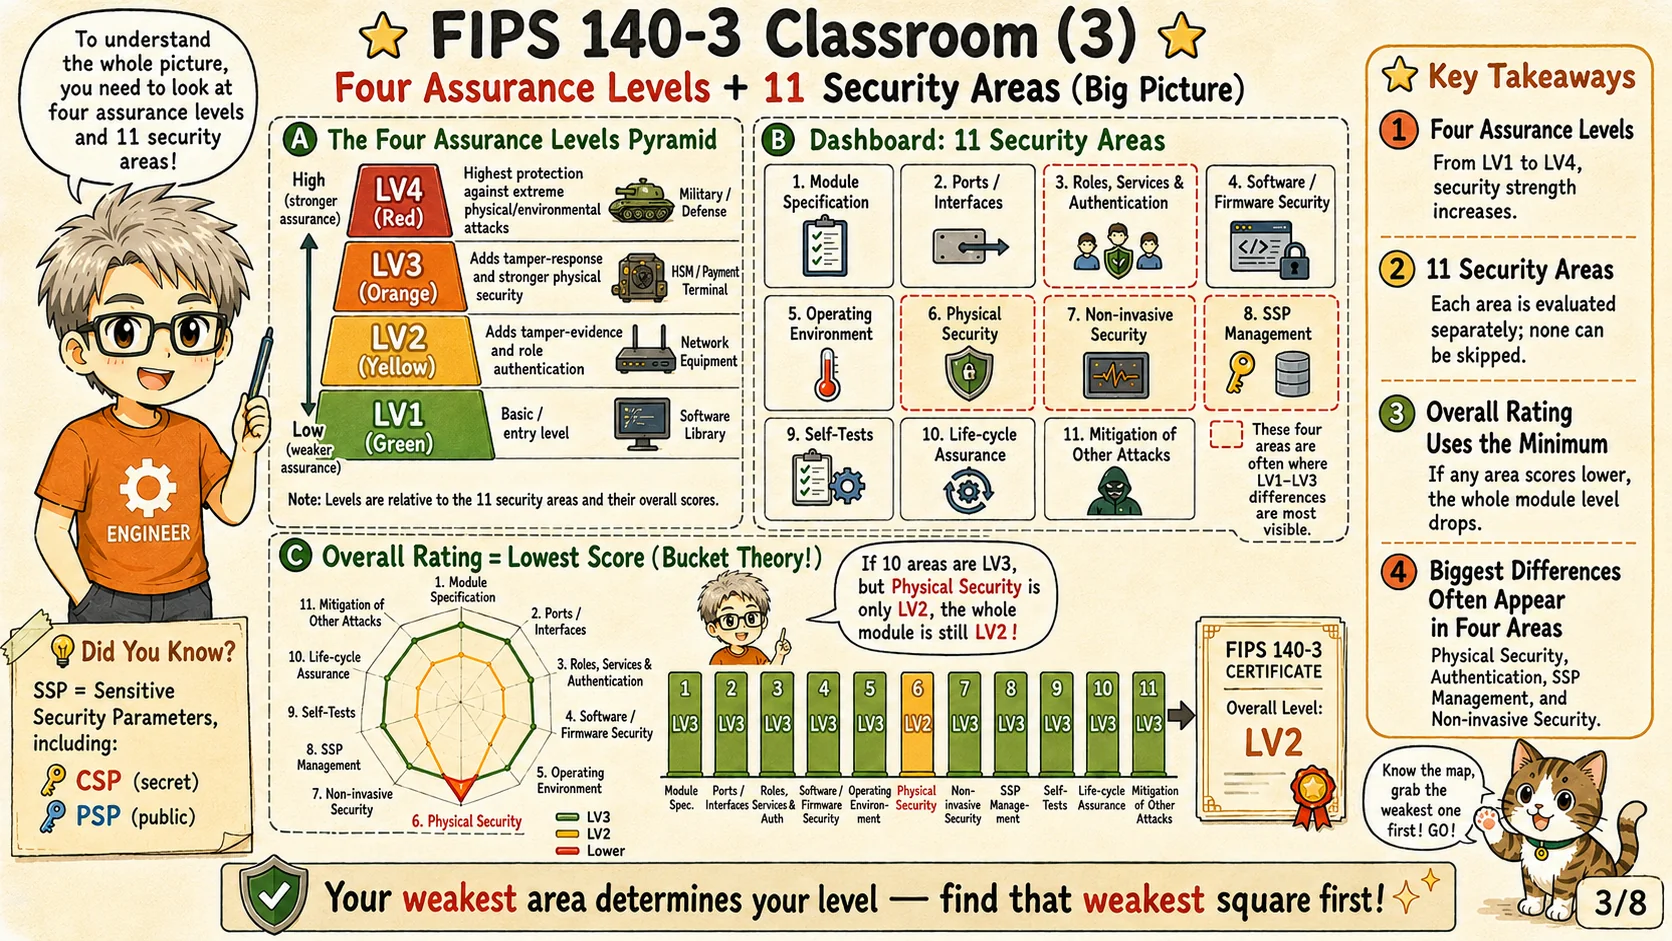
Security level is a product tradeoff
The third page gives the map: FIPS 140-3 has four security levels and eleven security requirement areas. The final level is not determined by the strongest feature in the design; it is constrained by the weakest applicable area. A module cannot compensate for weak physical security by having a beautiful AES engine.
Level 1 is the foundation: approved algorithms, production-grade components, defined roles and services, self-tests, and consistent documentation. Level 2 adds stronger role separation and visible tamper evidence. Level 3 moves into identity-based authentication, stronger physical protection, trusted paths or channels for sensitive parameters, and tamper response. Level 4 is for even more aggressive environmental and physical attack assumptions.
Choosing a level is not an ego contest. Level 1 may be appropriate for a software crypto library or an internal accelerator used in a controlled environment. Level 2 may fit network appliances or enterprise equipment where tamper evidence and role separation matter. Level 3 is usually the conversation for HSMs, secure elements, payment/security devices, and chips that must protect keys even if the attacker can touch the hardware.
The product manager's question should be: Which customer, procurement requirement, threat model, operating environment, and cost structure justify this target level? The RD question should be: What must be designed now so that the target level is still feasible later?
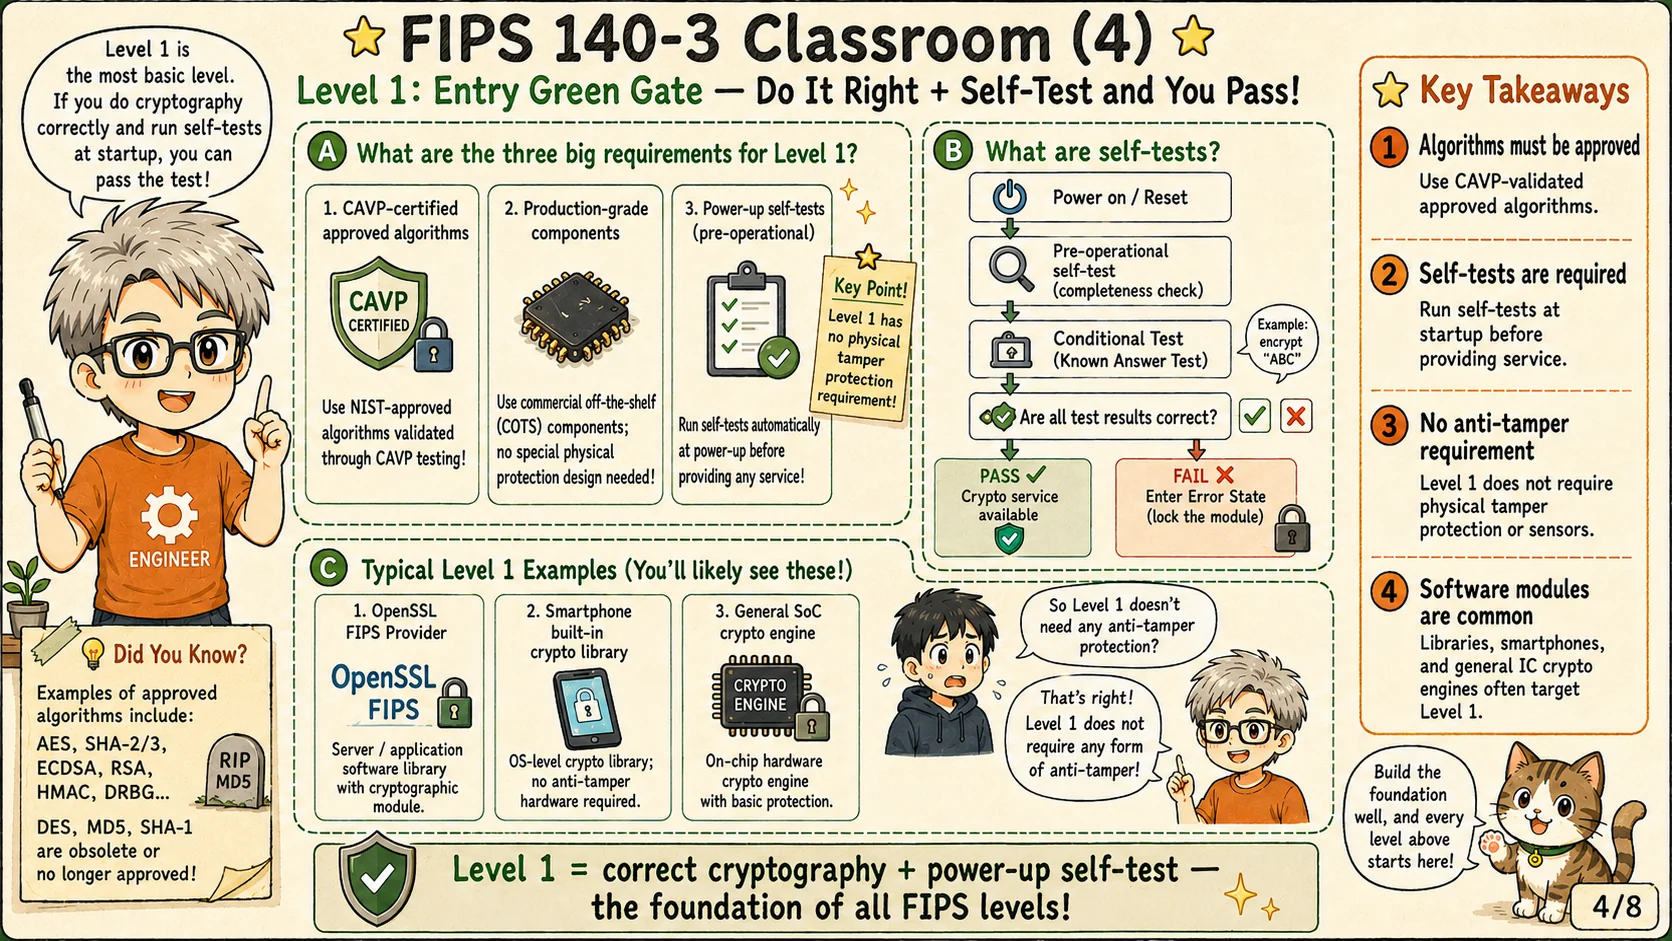
Level 1 is the green foundation
The fourth page focuses on Level 1. Level 1 is not 'no security'; it is the baseline that says the cryptography must be correct, approved, documented, and checked before service is provided.
The three ideas on the page are the practical starting point: use NIST-approved algorithms validated through CAVP, use production-grade components, and run required power-up or pre-operational self-tests before the module provides cryptographic service.
Self-tests are not manufacturing-only checks. They are part of the module's runtime security behavior. If the AES known-answer test, firmware integrity test, or another required test fails, the module must enter an error state or otherwise prevent invalid cryptographic service.
Level 1 generally does not require physical anti-tamper protection. That is why software libraries, operating-system crypto providers, smartphone built-in crypto libraries, and general SoC crypto engines often target Level 1 when the environment and customer requirement allow it.
For hardware teams, Level 1 is still worth designing cleanly. Approved algorithms, reset sequencing, self-test gating, status reporting, and error latching become the foundation for every higher level.
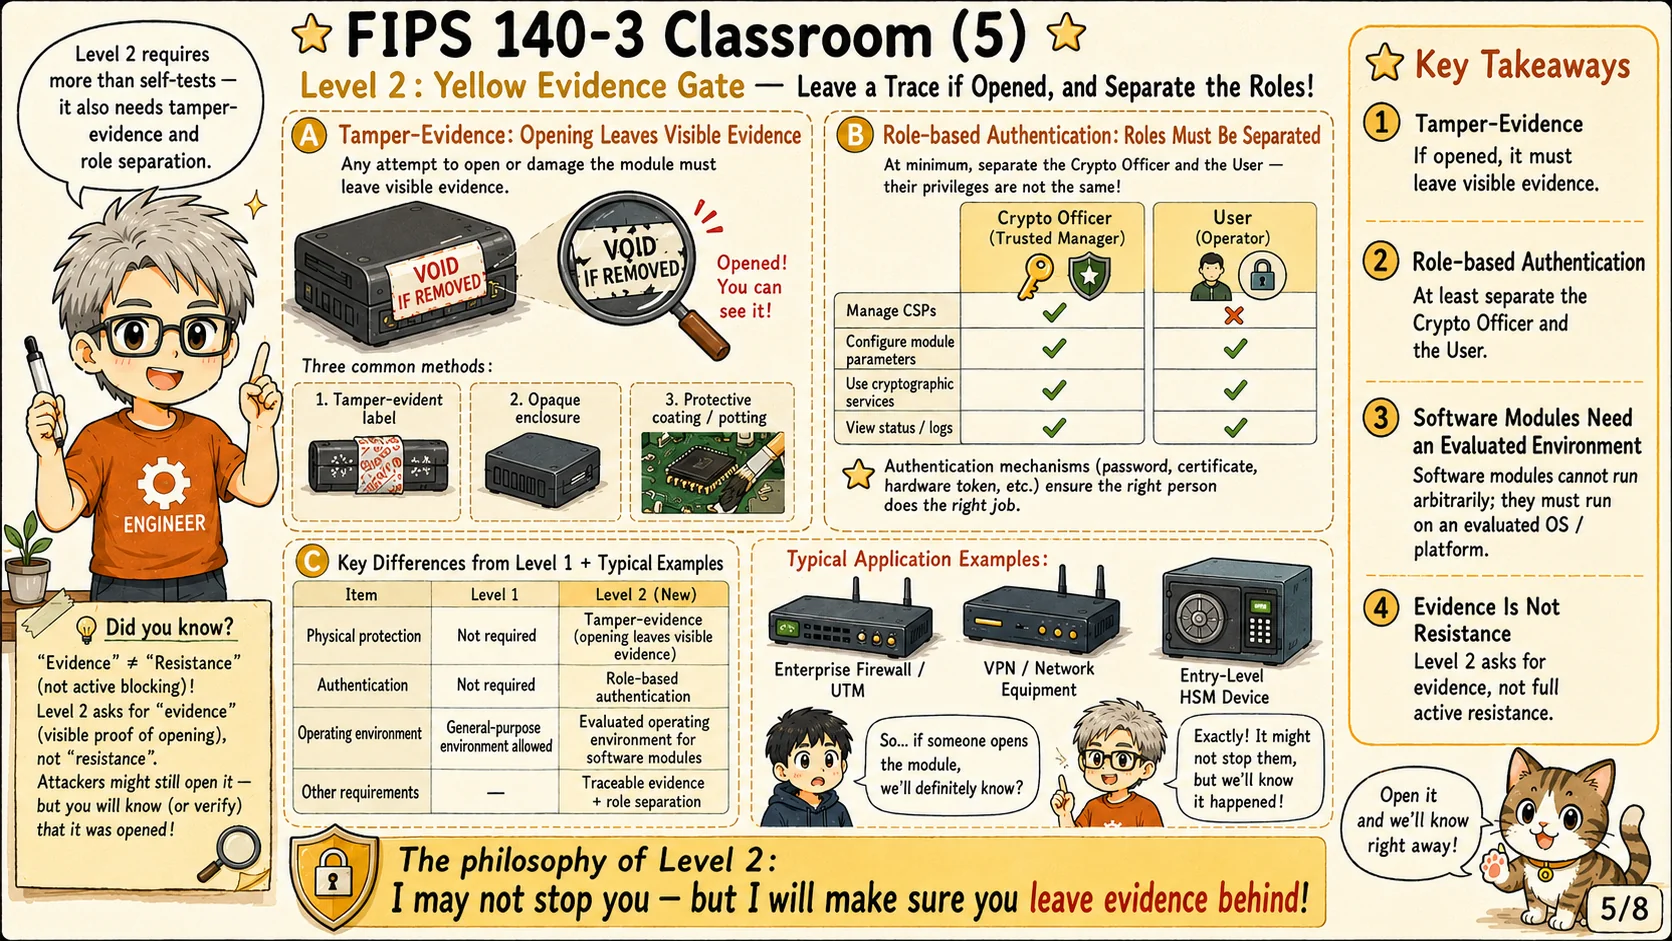
Level 2 adds evidence and role separation
The fifth page explains Level 2 as the yellow evidence gate. The philosophy is simple: the module may not stop every physical attempt, but if it is opened or disturbed, the attempt should leave visible evidence.
Tamper evidence can be implemented through labels, seals, opaque enclosures, coatings, potting, or other mechanisms appropriate to the module type. Level 2 is not full active resistance; it is proof that the module was opened, modified, or exposed.
Level 2 also introduces stronger role separation. At minimum, the Crypto Officer and User roles should not have identical privileges. The Crypto Officer may manage CSPs and module parameters; the User may be allowed to use approved cryptographic services.
For software modules, Level 2 may also bring evaluated operating environment requirements. That means the module cannot run arbitrarily anywhere and still claim the same validated posture; the operating system or platform assumptions matter.
Typical Level 2 products include enterprise firewalls, VPN/network equipment, and entry-level HSM-like devices. The engineering challenge is to make the evidence, roles, and operational assumptions match the real product.
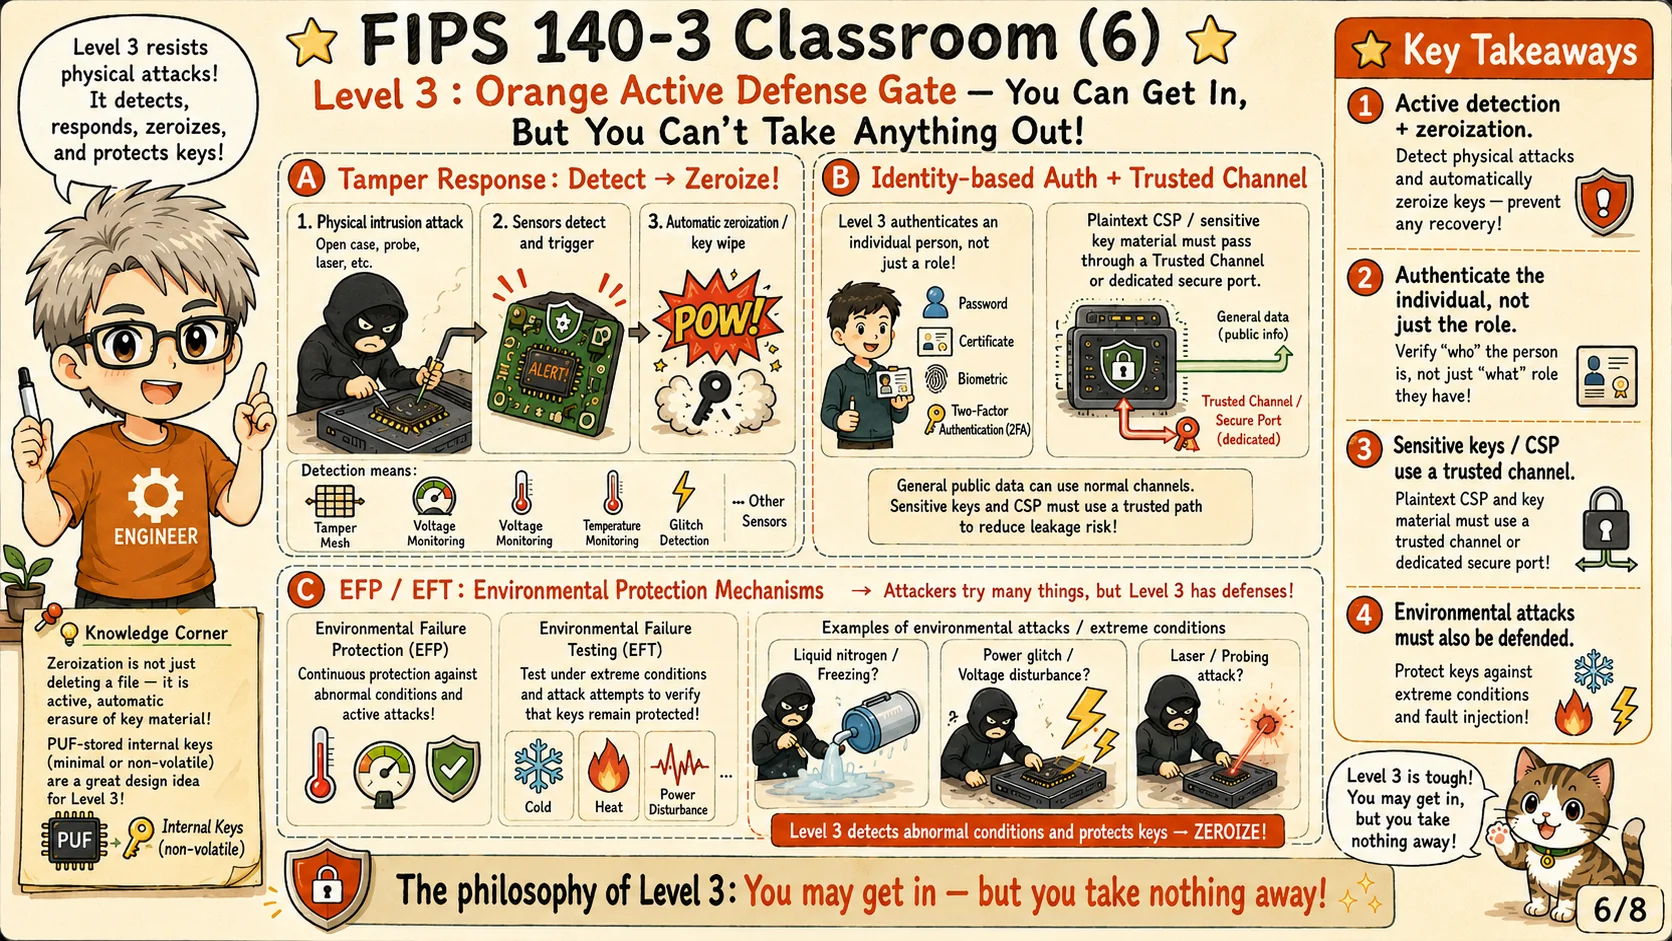
Level 3 protection depends on embodiment and applicable requirements
Level 3 physical protection depends on the module embodiment and applicable requirements. IG 7.A Table 2 distinguishes hardness, protection against probing through openings, and response for doors, covers or maintenance access. It does not require every module to actively detect and respond to every physical attack.
Physical requirements depend on the module embodiment and applicable clauses. Detection and response can protect sensitive material. Where zeroization is required, verify its method, scope, trigger and completion indication. Removing a software reference does not prove that every copy is irrecoverable, and Level 3 does not imply resistance to every physical attack.
Level 3 also strengthens authentication. The module authenticates the individual, not only the role label. Passwords, certificates, hardware tokens, biometric factors, or multi-factor mechanisms may be part of the product's authentication story.
Trusted channel or trusted path requirements can be especially costly if ignored early. Plaintext CSPs or sensitive key material should not pass through a casual command path, debug port, shared bus, or unprotected interface.
Environmental failure protection (EFP) or testing (EFT) addresses the applicable temperature and voltage conditions. Do not expand that into a claim that all clock glitches, lasers or electromagnetic fault-injection attacks were tested or defeated. Other fault claims need the relevant requirements, Security Policy and threat model.
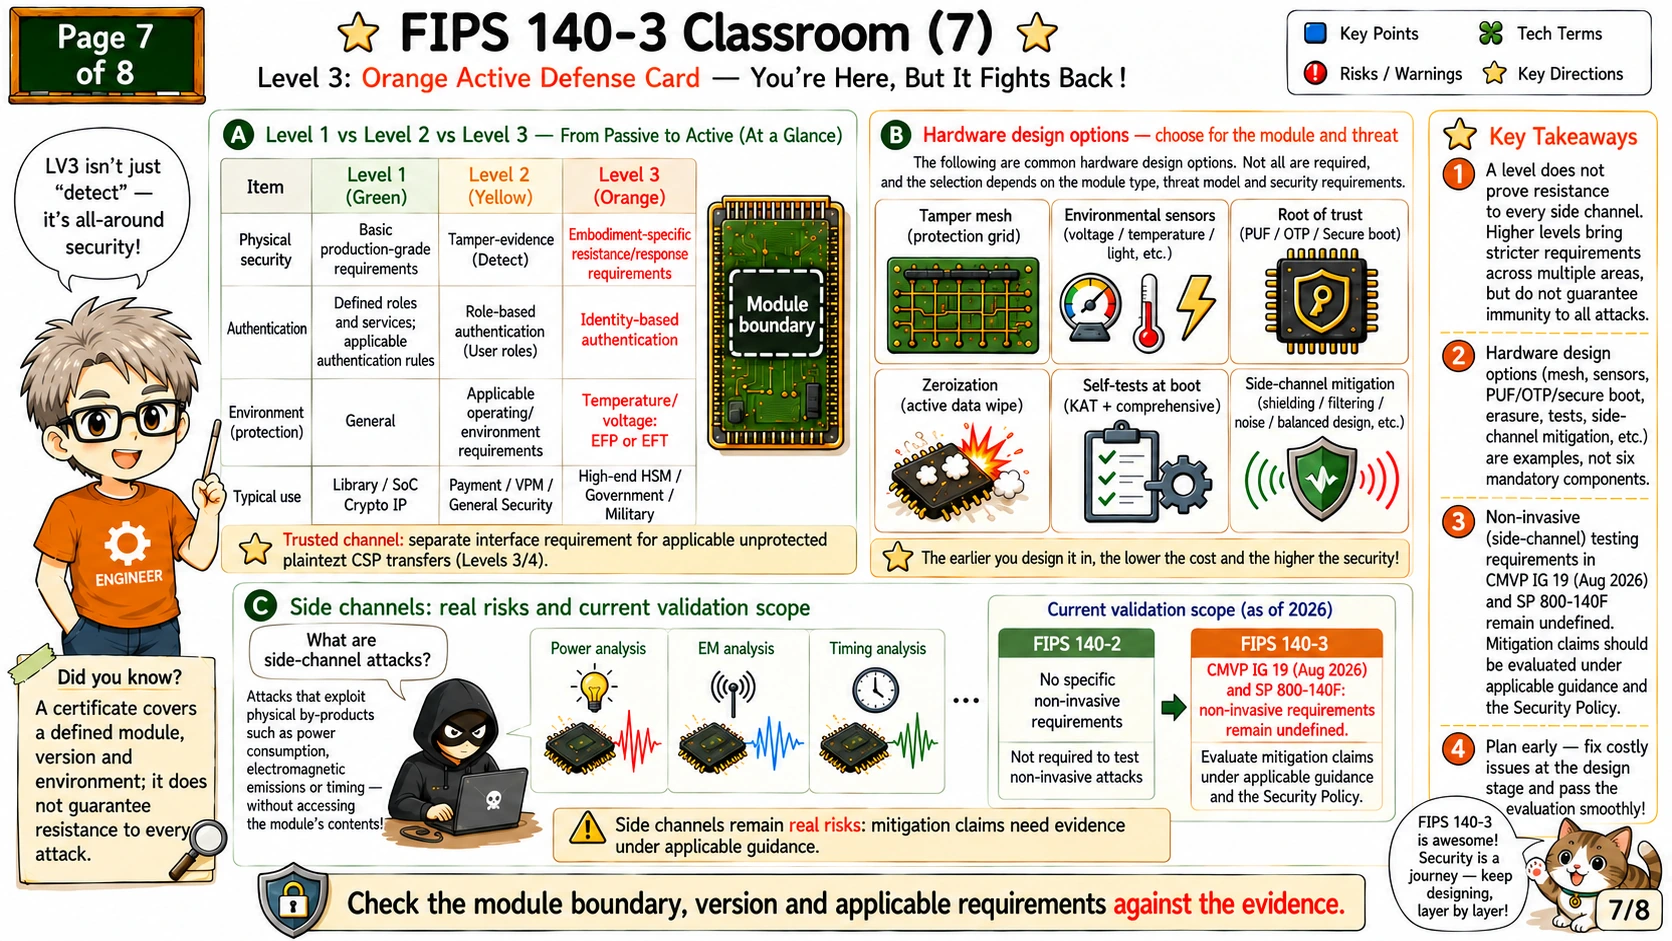
Level 3 hardware needs layered components
Tamper mesh, environmental sensors, a root of trust, PUF/OTP or secure storage, zeroization circuits, self-tests, shielding, filtering and lifecycle controls can support a hardware design. They are options selected for its embodiment, boundary and requirements, not six universal ingredients mandated for every Level 3 module. Their triggers, error states and SSP handling need consistent evidence.
Read the table by embodiment and applicable clauses. Identity-based authentication, conditional physical categories and EFP or EFT have distinct requirements. Environmental testing does not itself require continuous active monitoring.
Power, electromagnetic and timing leakage remain real engineering risks. However, the 19 August 2026 CMVP IG makes non-invasive requirements non-applicable until SP 800-140F defines them. Its current edition specifies no additional test requirements. Non-invasive mitigation claims currently fall under the applicable guidance for mitigation of other attacks. A Level 3 or 4 certificate does not prove resistance to every side channel.
This is where PUF and root-of-trust design become part of a broader architecture. NeoPUF, OTP, secure boot, key ladder, and lifecycle state can support identity and key protection, but the certificate still evaluates the complete module behavior.
The earlier these blocks are designed in, the lower the cost and the more credible the security story. Adding tamper mesh, side-channel countermeasures, secure provisioning, or trusted channels late can affect floorplan, package, firmware, manufacturing, and customer documentation.
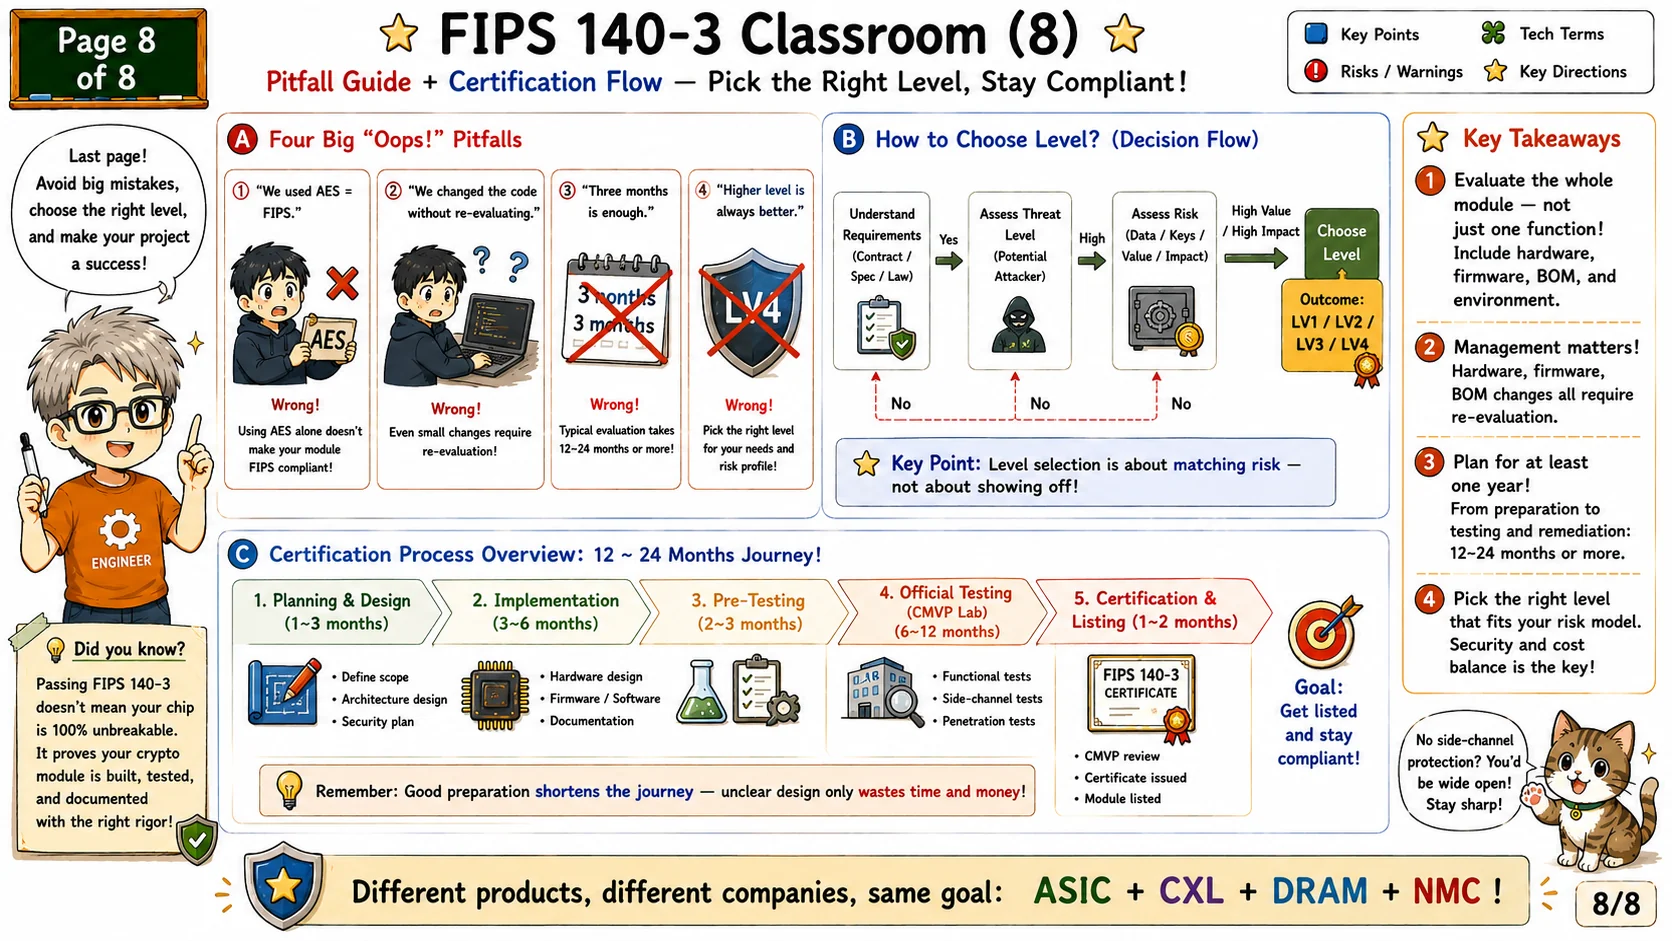
Choose the right level and plan the certification journey
The final page is the pitfall guide. The four common mistakes are painfully familiar: 'we used AES, so we are FIPS', 'we changed the code without re-evaluation', 'three months is enough', and 'higher level is always better'. Each one can damage schedule, budget, or customer trust.
Level selection should match the risk model. Start with customer requirements, contracts, procurement rules, threat level, data value, key value, operating environment, and attack assumptions. Then choose Level 1, 2, 3, or 4 based on the product's real security and cost balance.
FIPS validation is a journey: planning and design, implementation, pre-testing, official CSTL testing, CMVP review, certificate issuance, and module listing. The plate’s 12 to 24 months is a project estimate, not a CMVP commitment. Document preparation, lab findings, remediation, queue time and re-review affect the actual schedule.
Management matters. Hardware changes, firmware updates, BOM changes, toolchain changes, security-policy changes, and manufacturing changes can require evaluation or re-validation. A certified module needs configuration control and lifecycle discipline after the first certificate is issued.
The best closing rule is simple: evaluate the whole module, not one function. Include hardware, firmware, software, package, operating environment, key lifecycle, self-tests, and user guidance. FIPS is not only a certificate; it is a forcing function for making the security architecture explicit.
References
- NIST FIPS 140-3: The official cryptographic module security requirements.
- NIST Cryptographic Module Validation Program: Official validation-program process and module listings.
- eMemory NeoPUF: Official eMemory reference for NeoPUF as a hardware security primitive for chip-unique identity, authentication, and security key generation.
- PUFsecurity, NeoPUF: A Reliable and Non-traceable Quantum Tunneling PUF: Technical background for understanding NeoPUF-style hardware identity and key-generation primitives inside larger security modules.
Exercise: does correct AES mean service may run?
Use an explicitly fictional module record to inspect certificate status, version, operating environment, boundary, approved mode and self-test separately. A failed self-test enters ERROR_LATCHED and blocks the modeled service even if every other condition passes.
This page and its browser cryptography are not CMVP validated. The table models procurement checks and a service gate; it is not a complete FIPS 140-3 test, official Security Policy or live certificate lookup. Historical status is rejected for this conservative new-system case; existing-system use requires official policy and procurement review. An algorithm certificate is not a module certificate.
Learning guide
Security Assurance and Product Lifecycle
Open the course outline → · Progress counts published lessons only
Prerequisites
- Cryptographic services and module boundaries
What I learned
- Explain what validation covers
- Compare security levels
- Identify boundary and key-management risks